

Diagnosing Chain Breaks: Material and Link Analysis
If your gold chain broke, how to fix it depends on the location and type of break. For an open jump ring or detached clasp, you can perform a cold mechanical repair using smooth-jaw pliers to twist the ring closed. For a severed solid gold link, micro-torch soldering with karat-matching gold solder provides a permanent bond, whereas delicate weaves (such as rope or herringbone) and hollow links require precision laser welding to avoid melting or freezing adjacent links.
Before you reach for your toolkit or schedule a service appointment, you need to understand exactly what caused the break. A failure is rarely random; it is usually the result of mechanical tension, daily friction, or metallurgical fatigue.
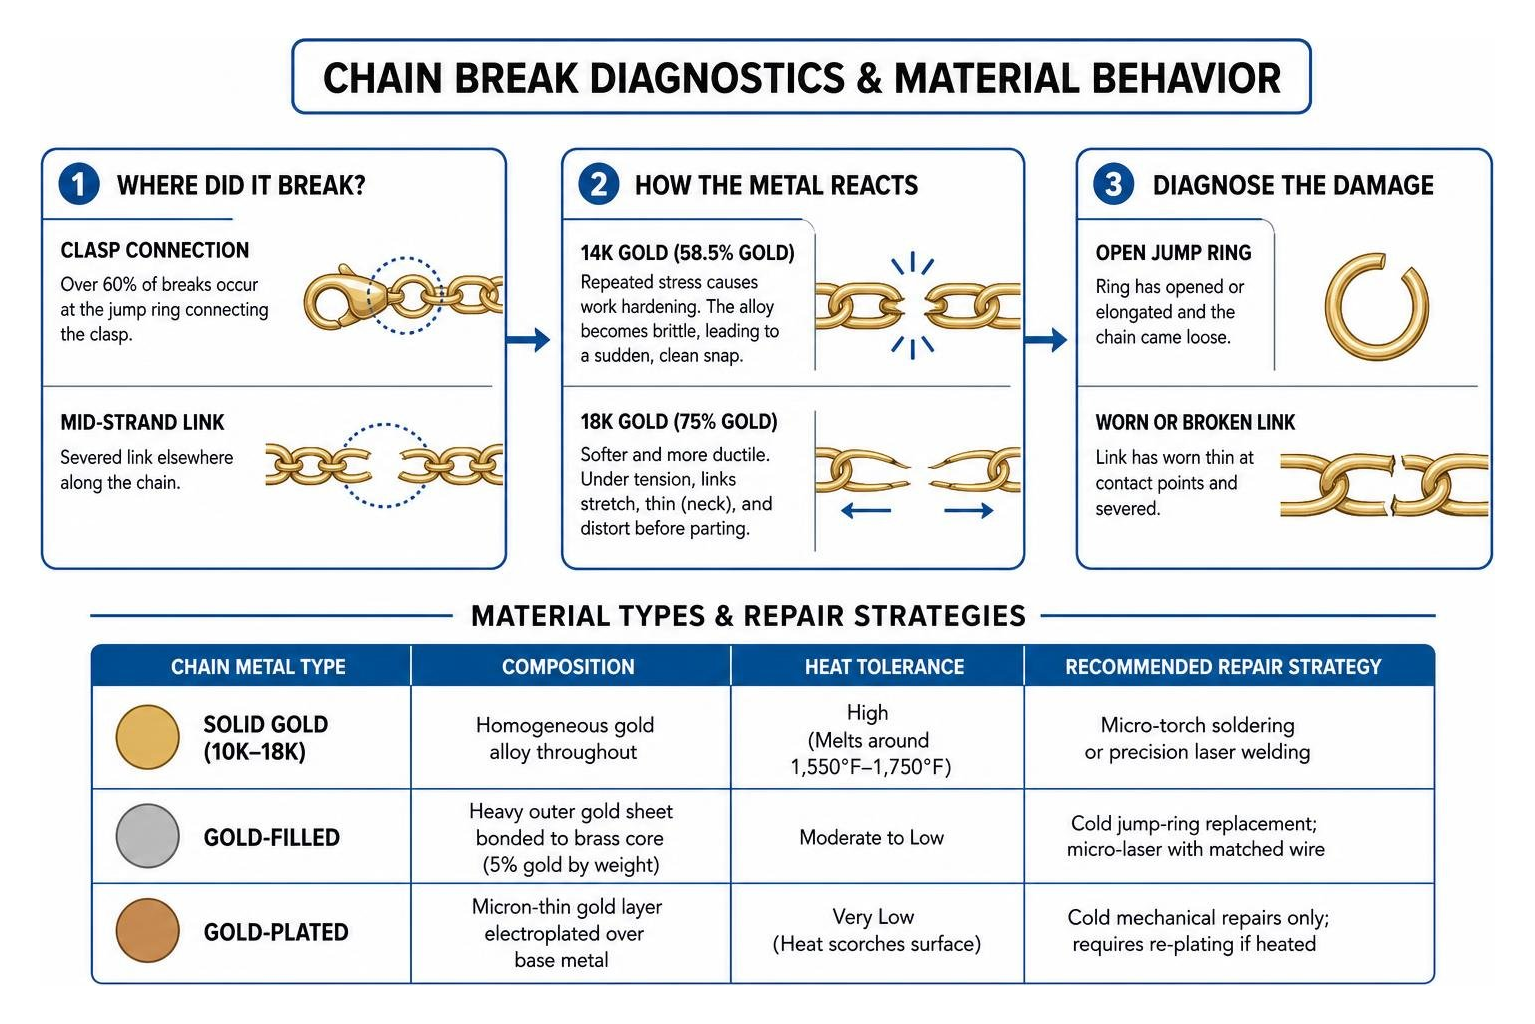
When gold experiences continuous stress, the metal changes at a microscopic level. In 14K gold (which consists of 58.5% pure gold alloyed with copper, silver, and zinc), repeated bending causes work hardening. The alloy becomes brittle over time, leading to a sudden, clean snap under minimal force. Conversely, 18K gold (75% pure gold) is naturally softer and more ductile. Under tension, an 18K link will usually stretch, thin out, and distort—a phenomenon known as "necking"—before it finally parts.
Over 60% of chain breaks occur at the jump ring connecting the clasp. This tiny circular link absorbs the brunt of every tug, snag, and movement. If your necklace suddenly comes loose, examining whether the chain clasp broke or if a mid-strand link severed is your first diagnostic step.
| Chain Metal Type | Composition | Heat Tolerance | Recommended Repair Strategy |
|---|---|---|---|
| Solid Gold (10K–18K) | Homogeneous gold alloy throughout | High (Melts around 1,550°F–1,750°F) | Micro-torch soldering or precision laser welding |
| Gold-Filled | Heavy outer gold sheet bonded to brass core (5% gold by weight) | Moderate to Low | Cold jump-ring replacement; micro-laser with matched wire |
| Gold-Plated | Micron-thin gold layer electroplated over base metal | Very Low (Heat scorches surface) | Cold mechanical repairs only; requires re-plating if heated |
Identifying Damage Across Chain Styles
Different chain constructions fail in distinct ways, dictating the repair method required:
- Cable and Curb Chains: These classic oval-link designs are the easiest to evaluate. Damage typically manifests as an open jump ring or an individual link wearing through at its point of contact with adjacent links.
- Box Chains: Built from tiny square, geometric links, box chains can collapse or pull apart when crushed or snagged. A single collapsed box requires meticulous alignment or link removal.
- Rope Chains: These intricate, spiraling weaves consist of dozens of interconnected wire loops. When a rope chain snaps, multiple surrounding wires unravel instantly. Traditional torch repair often flows solder into neighboring loops, freezing the fluid movement of the chain.
- Herringbone Chains: These flat, mirror-smooth chains are extremely vulnerable to kinks. Once a herringbone link bends or twists, the structural integrity is compromised. Straightening them rarely restores their original flat profile, and heat will often warp the surrounding weave.
To master basic diagnostic skills, check out our guide on how to find reliable jewelry repairing services.
Solid Gold, Gold-Plated, and Gold-Filled Distinctions
Before applying any tools, verify the metal composition by inspecting the karat stamp near the clasp:
- Solid Gold: Look for stamps like "10K", "14K", "18K", "585", or "750". Solid gold can be safely soldered or welded because the alloy is consistent throughout the entire piece.
- Gold-Filled: Marked as "1/20 14K GF" or "GF". Applying a torch will often melt the inner brass core before the outer gold layer reaches soldering temperature, ruining the finish.
- Gold-Plated: Stamped "GP", "GE", or "HGE". Direct heat burns off the microscopic gold layer instantly, leaving an unsightly black mark and exposing raw base metal.
For a comprehensive breakdown of jewelry construction, consult our jewelry repair near complete guide.
Gold Chain Broke: How to Fix It at Home or Professionally
When an accident happens, the correct repair method depends entirely on your tools, your experience, and the chain's construction.
Cold Repairs: Gold Chain Broke How to Fix Without Heat
If the issue is an opened jump ring or a detached clasp, you can execute a strong, non-thermal repair using basic hand tools. This method is the safest option for gold-plated, gold-filled, and hollow-link chains.
- Prepare Your Tools: You will need two pairs of smooth-jaw chain-nose jewelry pliers. Never use serrated household pliers, as the steel teeth will permanently gouge the soft gold.
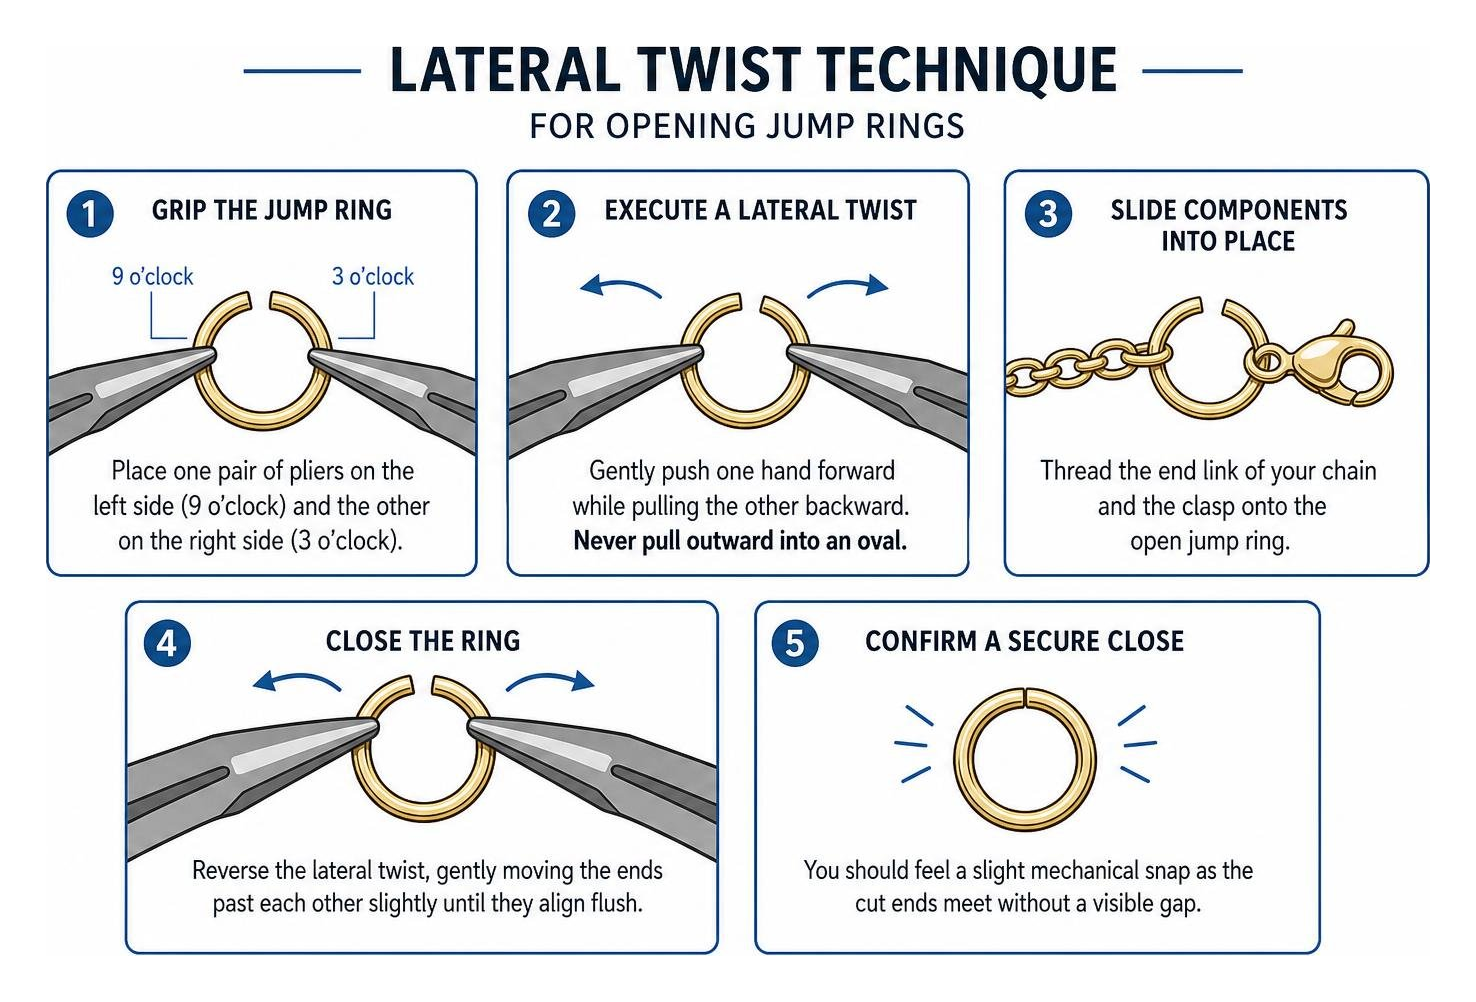
- Grip the Jump Ring: Place one pair of pliers on the left side of the jump ring's slit (at the 9 o'clock position) and the other pair on the right side (at the 3 o'clock position).
- Execute a Lateral Twist: Gently push one hand forward while pulling the other backward. Never pull the ring outward horizontally into an oval 'C' shape. Pulling outward weakens the molecular structure and permanently ruins the ring's circular geometry.
- Slide the Components Into Place: Thread the end link of your chain and the clasp onto the open jump ring.
- Close the Ring: Reverse the lateral twist, gently moving the ends past each other slightly until they align flush. You should feel a slight mechanical snap as the cut ends meet without a visible gap.
Soldering Guide: Gold Chain Broke How to Fix with a Torch
For solid gold chains with a snapped link, micro-torch soldering provides a permanent bond. This requires intermediate metalworking skill.
- Workspace Preparation: Work on a fireproof soldering block under bright lighting. Use a 10× jeweler's loupe to inspect the break.
- Clean the Metal: Clean the broken area with isopropyl alcohol or warm soapy water to eliminate body oils, lotions, and dirt that prevent solder adhesion.
- Apply Soldering Flux: Paint a drop of liquid jewelry flux across the joint. Flux prevents oxidation and encourages the solder to flow evenly.
- Place the Solder: Cut a tiny 1.0 mm chip (pallion) of gold solder that matches your chain's karat (e.g., 14K plumb gold solder). Place the solder chip directly on the joint using a steel solder pick. Steel allows the solder to release cleanly, whereas titanium or tungsten can cause solder to cling.
- Apply Heat Correctly: Light your micro-butane torch. Direct the flame around the parent metal links rather than blasting the solder chip directly. Gold solder flows toward the hottest point; by heating the chain links evenly, capillary action will draw the molten solder cleanly through the entire joint.
- Quench and Pickle: As soon as the solder flashes and flows (around 1,300°F–1,400°F), remove the flame immediately. Quench the chain in water, then submerge it in a warm pickling solution for 5 to 10 minutes to dissolve glassy flux residue and surface fire-scale.
Refining, Stress Testing, and Polishing the Repaired Link
A repair is not complete until it has been tested for strength and finished to blend seamlessly with the rest of the necklace.
- Neutralize Pickling Acid: Remove the chain from the pickle bath using brass or plastic tweezers (never steel, which causes an electrochemical reaction that copper-plates your gold). Rinse thoroughly in water mixed with baking soda to neutralize residual acid.
- Perform a Tensile Stress Test: Grasp the chain three inches on either side of the repair. Apply firm, steady, linear tension—simulating about 3 to 5 pounds of pulling force. Do not jerk the chain. If the joint was a "cold joint" (where solder melted without properly fusing the base metal), it will fail under this controlled test rather than unexpectedly around your neck.
- Smooth Excess Solder: If excess solder created a lump, use a high-grit needle file (grade 4 or 6) or a fine silicone polishing wheel on a rotary tool to level the joint flush with the surrounding wire.
- Final Polish: Apply red jeweler's rouge or a dedicated gold-polishing compound to a microfiber cloth or soft muslin buffing wheel. Polish the repaired link using light, rapid passes until the joint matches the high-luster finish of the surrounding links.
For more information on restorative polishing techniques, read How to Fix a Broken Gold Necklace: Step-by-Step Repair Guide | Jewelry Style Radar.
When to Choose Professional Laser Welding Over DIY Soldering
While minor repairs can be managed at home, certain chain styles require specialized technology. In our workshop, we frequently see chains that were irreparably damaged by well-intentioned DIY torch attempts.
| Factor | Traditional Torch Soldering | Precision Laser Welding |
|---|---|---|
| Heat Spread | Broad (several millimeters) | Pinpoint (<0.5 mm) |
| Risk to Surrounding Links | High (adjacent links can fuse) | Virtually zero |
| Suitability for Hollow Chains | Poor (melts thin walls) | Excellent |
| Suitability for Intricate Weaves | Poor (freezes rope/wheat patterns) | Excellent |
| Average Professional Cost | $35 – $75 | $85 – $200+ |
Torch soldering spreads heat across several millimeters. On delicate weaves like rope or wheat chains, this heat causes solder to flow across adjacent links, creating a stiff, immovable section. Laser welding uses focused light energy with sub-millimeter precision, fusing the exact break point without heating surrounding metal.
If your piece requires professional attention, you can learn more about our on-site repairs or find local service in your community:
- Jewelry Repair in Golden CO
- Jewelry Repair in Lakewood CO
- Jewelry Repair in Littleton CO
- Jewelry Repair in Westminster CO
- Jewelry Repair in Arvada CO
- Jewelry Repair in Edgewater CO
- Jewelry Repair in Wheat Ridge CO
- Jewelry Repair in North Lakewood
Long-Term Maintenance and Break Prevention
Once your chain is restored, simple preventative habits will keep it secure around your neck:
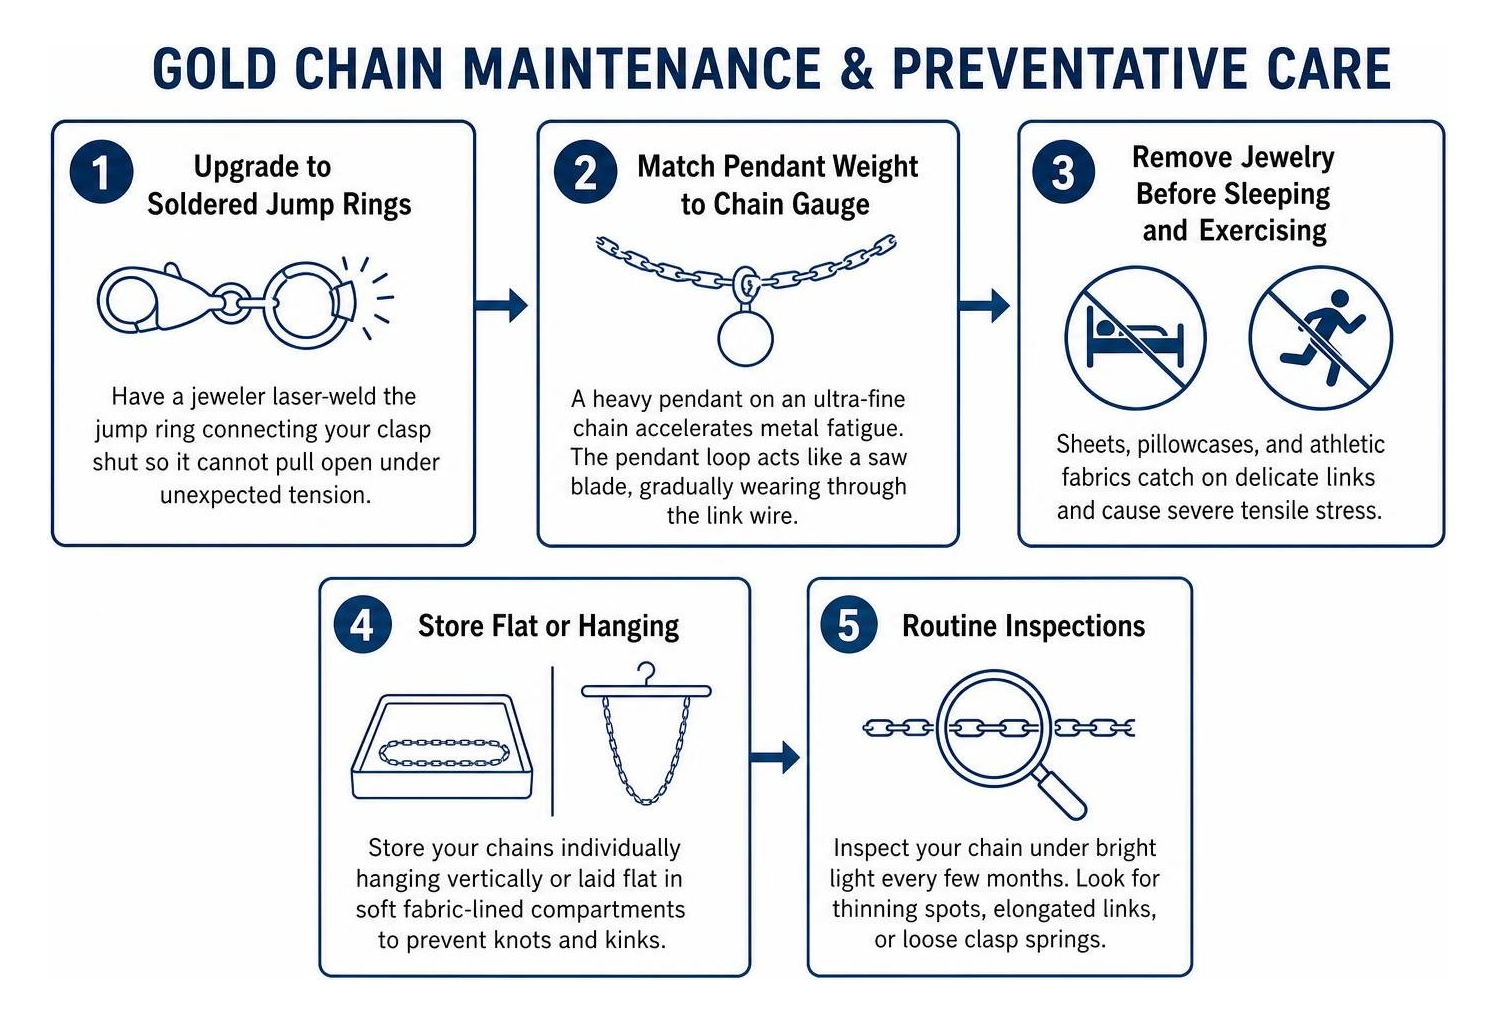
- Upgrade to Soldered Jump Rings: Have a jeweler laser-weld the jump ring connecting your clasp shut so it cannot pull open under unexpected tension.
- Match Pendant Weight to Chain Gauge: A heavy pendant on an ultra-fine chain accelerates metal fatigue. The pendant loop acts like a saw blade, gradually wearing through the link wire.
- Remove Jewelry Before Sleeping and Exercising: Sheets, pillowcases, and athletic fabrics catch on delicate links and cause severe tensile stress.
- Store Flat or Hanging: Store your chains individually hanging vertically or laid flat in soft fabric-lined compartments to prevent knots and kinks.
- Routine Inspections: Inspect your chain under bright light every few months. Look for thinning spots, elongated links, or loose clasp springs.
For additional guidance on locating trustworthy repair shops, read our article on local jewelry repair shops near me.
Frequently Asked Questions About Gold Chain Repairs
Can I fix a broken gold chain with superglue or an electronics soldering iron?
No. Cyanoacrylate adhesives (superglue) lack the tensile shear strength required to hold metal links under tension, and they leave a chemical residue that must be burned off before professional repair. Electronics soldering irons use low-temperature lead- or tin-based solder, which bonds poorly to gold, ruins its purity, and requires costly scraping and restoration.
Will repairing my gold chain decrease its appraisal or resale value?
If the repair is performed correctly with karat-matching gold solder or laser welding, there is no negative impact on resale or appraisal value. A seamless, structurally sound repair preserves the full intrinsic and artistic value of your jewelry.
How much does professional gold chain repair typically cost?
A standard torch solder or jump ring replacement on a simple link chain generally costs between $35 and $75. Intricate laser welding on complex styles like rope, wheat, or hollow chains typically ranges from $85 to $200+, depending on the number of breaks and chain thickness.
Conclusion
A broken gold chain does not have to stay hidden in a drawer. Whether you choose a simple cold fix for an open jump ring at home or require advanced laser welding for an intricate weave, identifying the material and damage type is the key to a lasting repair.
If you have a delicate, hollow, or heirloom piece that needs expert attention, our master craftsmen are here to help. As Colorado's oldest continuously operating watch and jewelry store since 1902, our family-owned shop provides dependable on-site repairs, custom design, and restoration.
Visit us for jewelry repair in Golden, CO to have your favorite gold chain restored to pristine, wearable condition.